skip to content

Stream

  • I tried Xylect

    Disclaimer: I received a free license key to test this app and post a review. The review content is entirely my own, with no conditions placed on its content or sentiment.

    Popclip is the usual app that people use for interactions with content on MacOS. Xylect takes it one step further, it aims to function like Google’s smart lens AI feature, it tries to predict what someone might want to do with selected text, rather than giving you a list of all possible options.

    Language selection dropdown, Keyboard shortcut recording button, Auto popup when double clicked checkbox, Enable debug logging checkbox, Translate or Summarize preference radio buttons, Enable explain & summarization checkbox, Enable "Add to calendar" checkbox, Enable spell check checkbox, Enable math expression evaluation checkbox, Enable flight tracking checkbox
    Language selection dropdown, Keyboard shortcut recording button, Auto popup when double clicked checkbox, Enable debug logging checkbox, Translate or Summarize preference radio buttons, Enable explain & summarization checkbox, Enable "Add to calendar" checkbox, Enable spell check checkbox, Enable math expression evaluation checkbox, Enable flight tracking checkbox

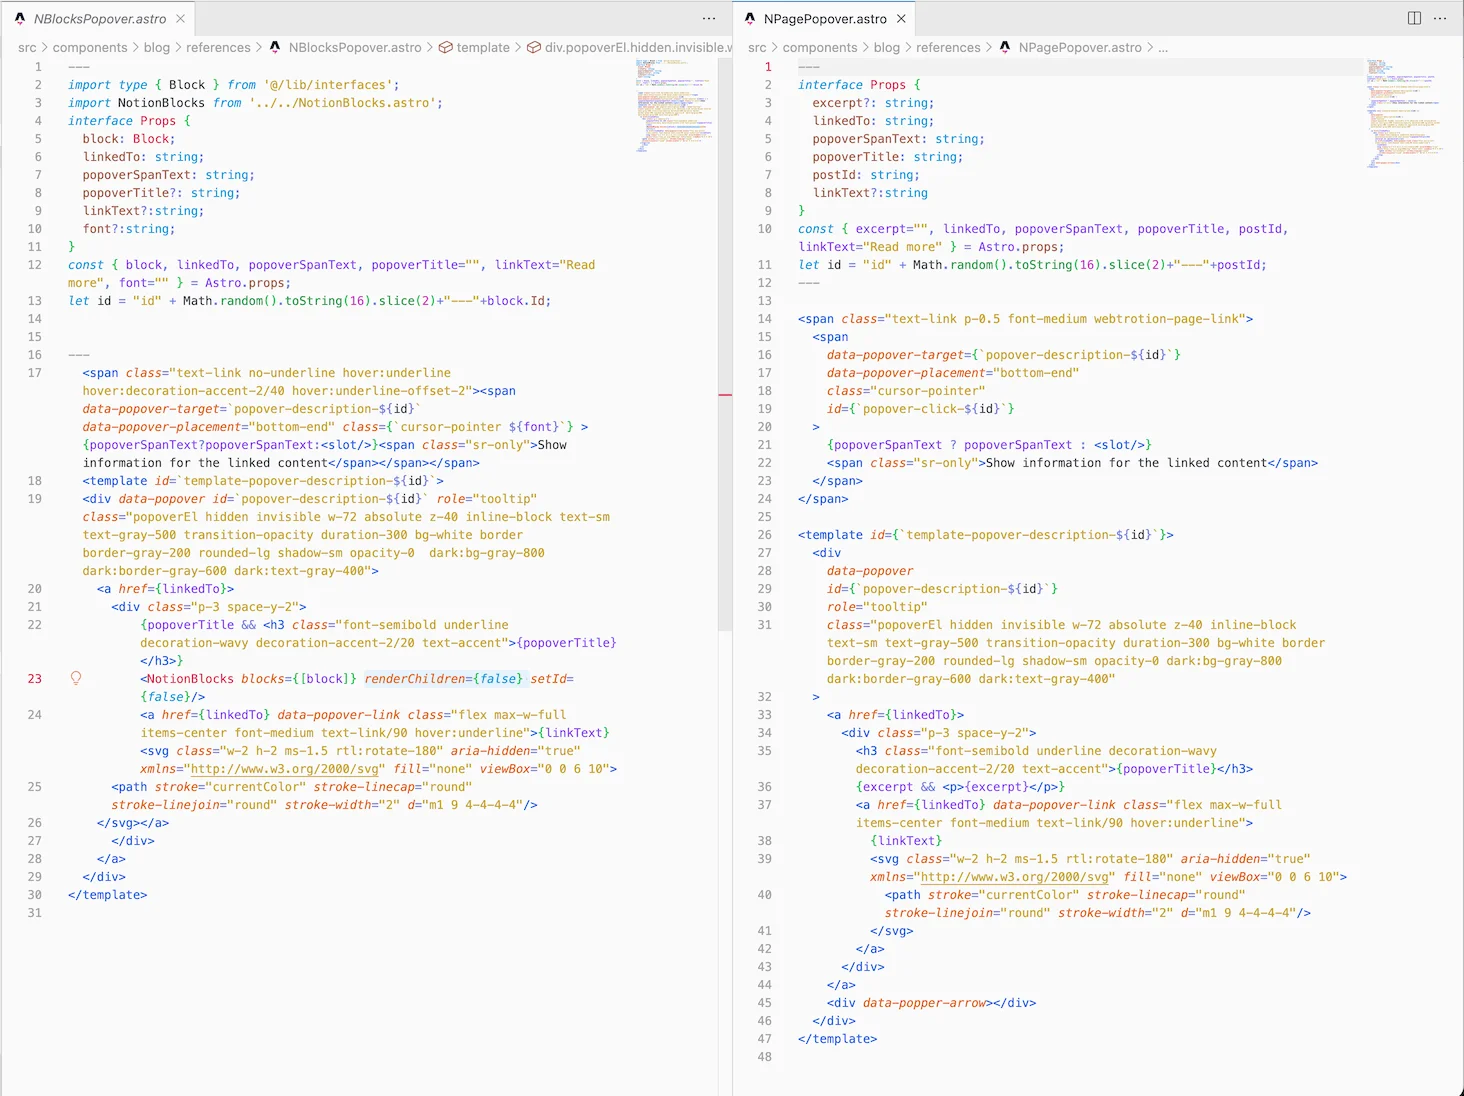
    So, let’s go through all the five (six?) claimed abilities at the moment.
    [Expand toggles to see screenshots]

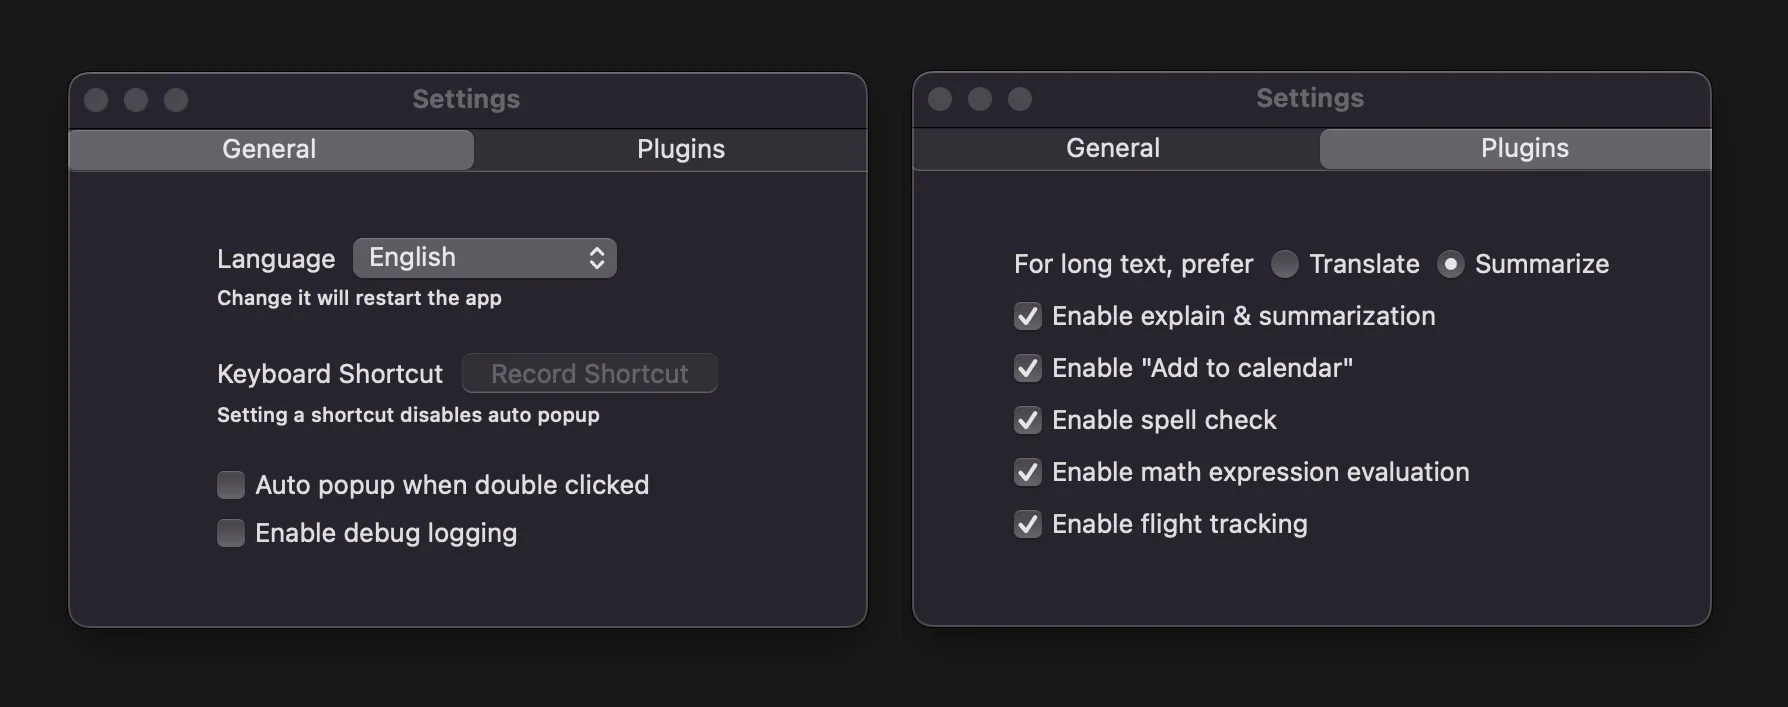
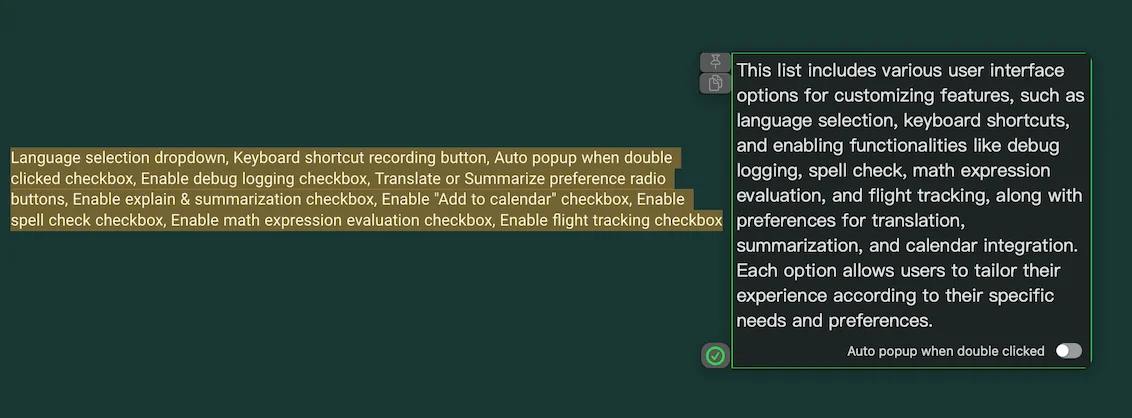
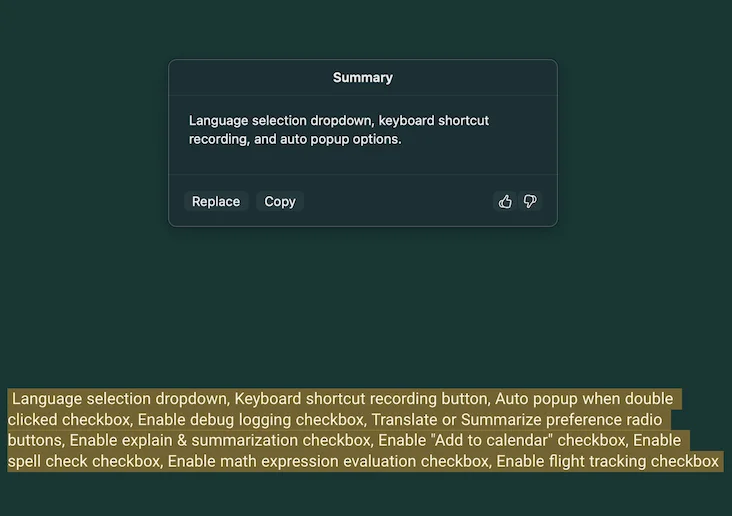
    The summarization feature works fine, but with the new writing tools in the latest version of Apple Mac OS, you probably won't need it. You can simply right-click on non-native apps or click the magic button on native apps to summarize content, and it will show up in a pop-up. I know it's an intentional step rather than an automatic pop-up, but I don't think it's worth getting the app just for this feature. Xylect is faster than Apple’s summarization, and that time savings adds up when you use the tool multiple times a day.
    Popup showing the summarization from Xylect
    Popup showing the summarization from Xylect
    Popup showing the summary from Apple’s new writing tools
    Popup showing the summary from Apple’s new writing tools
    I checked out the translation feature, and it seems to send the text to a backend model for translation, which is fine as it includes contextual information. However, it responds with a lot of text, even when I'm trying to translate just a single word. I wish this was more thoughtfully designed.
    Provides a full explanation of the translation for a Chinese word instead of just the translation itself.
    Provides a full explanation of the translation for a Chinese word instead of just the translation itself.
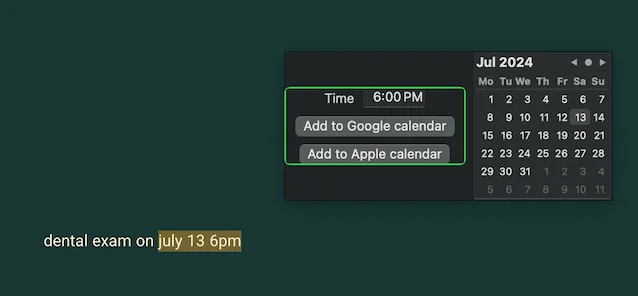
    The "Add to Calendar" feature works, but it requires a very specific date and time format. It doesn't fit in the title itself; it just creates a Google Calendar or Apple Calendar link based on the time. I'm not a big fan of that. Instead, I use Hey Dola for these purposes. It's free right now, though it might not stay that way. I'll link it here if you want calendaring with text or images, which makes it much easier.
    It works when you just select a time string
    It works when you just select a time string
    It doesn’t work when you select a title and time string
    It doesn’t work when you select a title and time string
    The spell check feature in Xylect works per word and doesn't understand context. So, while it can correctly spell "enable," it corrects "flght" to "fight" instead of "flight" because it's choosing the nearest correct word rather than the one that fits the context, even though you have the word "tracking" nearby.
    Correctly suggest the fix Enable for spelling correction
    Correctly suggest the fix Enable for spelling correction
    Incorrectly (contextually doesn’t make sense) correct “flght” to “fight” instead of “flight”
    Incorrectly (contextually doesn’t make sense) correct “flght” to “fight” instead of “flight”
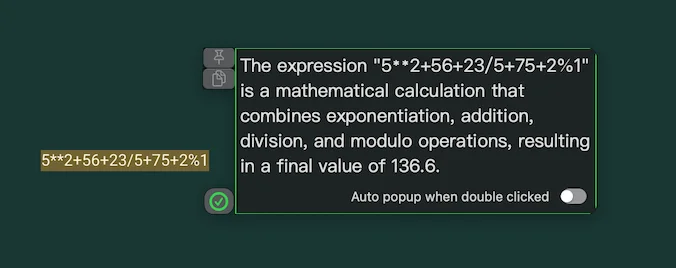
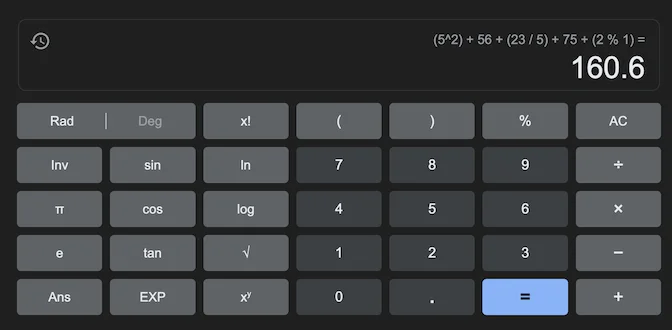
    The calculation option for the selected math text didn't work for me at all. It seems like it's sending the text as a prompt to a machine learning model and returning the answer, rather than performing the calculation on the backend, so I wouldn't rely on this feature.
    The calculation option absolutely did not work for me, the answer is incorrect.
    The calculation option absolutely did not work for me, the answer is incorrect.
    The correct answer to the expression shown in Google calculator.
    The correct answer to the expression shown in Google calculator.
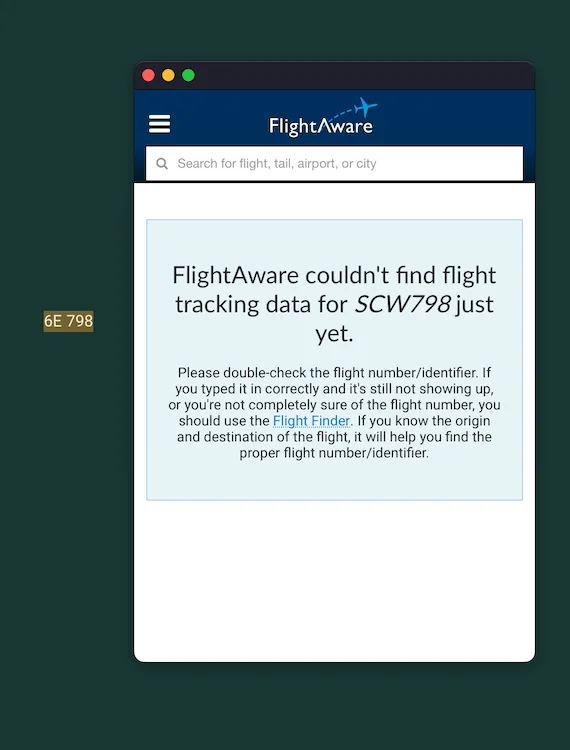
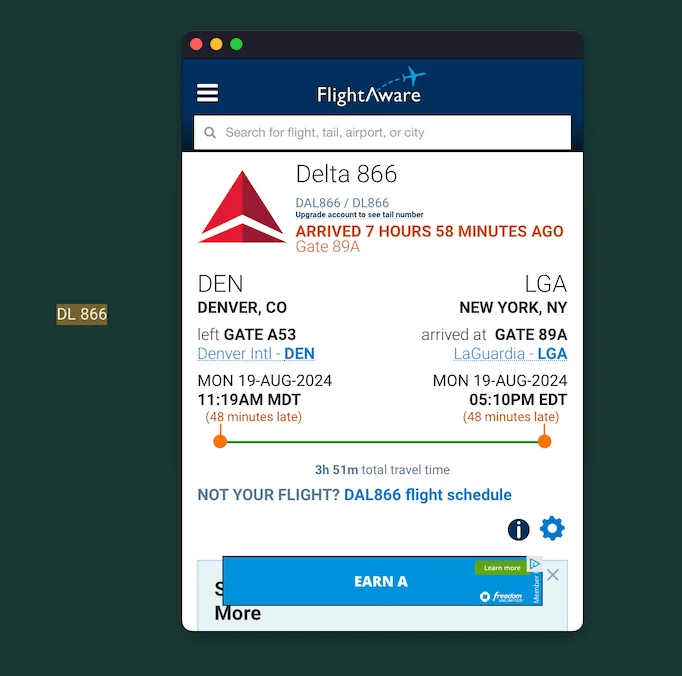
    The flight feature is nice, but I often end up using Raycast for flight tracking anyway. Some flights work, some don't. It's integrated with FlightAware, so I'm not sure how much of it is a Xylect’s issue versus a FlightAware issue. It seems to work for US flights but not for Indian flights, whereas I can use Raycast for both types of flights.
    It cannot pull in information from a Indian flight number (6E 798)
    It cannot pull in information from a Indian flight number (6E 798)
    It can pull in information and show as a FlightAware popup for an American flight — here I use DL 866 as an example.
    It can pull in information and show as a FlightAware popup for an American flight — here I use DL 866 as an example.


  • Your Background Remover May Just Be Setting the Background to Be Transparent

    I came across this post on reddit today where they use birefnet for background removal and then Florence for object detection, and the Florence model ends up restoring their background. No, this isn’t a training data issue. TIL, Apparently some background removal apps just set the transperancy of background pixels to 0 — they still have all the original color information in them. And all someone would need to do to restore the image would be to set all pixels to be opaque.

    A pretty huge privacy risk, especially for someone like me, who uses this as an alt account

    A screenshot of a reddit post asking why a model can read background from their “background removed” image, showing florence input on left with no background and complete original image on right with all information.
    A screenshot of a reddit post asking why a model can read background from their “background removed” image, showing florence input on left with no background and complete original image on right with all information.

  • MacOS Inbuilt Screensharing and Document Templates

    Aug 1, 2024, I saw ProperHonestTech’s video on my Youtube timeline titled “Mac owner? STOP doing these 11 things!” — and I don’t usually watch these, but this one I did. And I learnt two new things.

    1. MacOS has inbuilt screensharing
    2. You can assign documents to behave as templates

    Screensharing

    You can learn more about screensharing on MacOS here. It seems like it internally uses a Facetime API because you see those controls pop up in the menu bar.

    [Expand toggles to see screenshots]

    Screensharing is a hidden application. It doesn’t show up on your Application or Launchpad. You need to open screensharing app using Raycast or Spotlight.
    A raycast window showing screen sharing application
    A raycast window showing screen sharing application
    It opens up a screen showing all the connections you have. You can also create groups to manage all connections you have had.
    Image uploaded to Notion
    Then you can enter a hostname or apple id (yes, any apple id) to connect to.
    Image uploaded to Notion

    And voila, now you are screensharing.

    Screensharing screen showing the controls: namely remote control, dynamic resolution, hdr sharing, launchpad, mission control, and desktop buttons with zoom buttons on top right of the window.
    Screensharing screen showing the controls: namely remote control, dynamic resolution, hdr sharing, launchpad, mission control, and desktop buttons with zoom buttons on top right of the window.
    You can also modify what you see on the toolbar
    Image uploaded to Notion
    And modify the settings for display scaling and quality
    Display settings menu showing options for screen scaling and scrolling behavior on larger screens, with selected choices highlighted.
    Display settings menu showing options for screen scaling and scrolling behavior on larger screens, with selected choices highlighted.
    Quality settings menu for remote screens, showing options to adapt quality to network conditions or display at full quality, with adaptive option selected.
    Quality settings menu for remote screens, showing options to adapt quality to network conditions or display at full quality, with adaptive option selected.

    Screensharing shares microphone by default. You can mute the microphone in the Connection menu item. It also shares clipboard by default which can be changed in the Edit menu item.

    You can copy paste or drag text, images and files during screensharing. Universal clipboard is not available during screensharing. You can’t have both Screen Sharing and Remote Management on at the same time.

    Document Templates

    You can create document templates, such that you don’t need to worry about modifying the original document, hence, called “stationery” in MacOS. To do this, select the document and use Get Info or ⌘ + I . In the general section, select Stationery pad. Make sure it is a document you can edit, and not a folder or an alias.

    Now, everytime you open that document, it will duplicate itself — without you needing to worry about modifying the original.


  • Keyboard Shortcut for Text Input in Shortcuts

    I have this little shortcut that takes an URL, gets HTML of the page, takes a screenshot, tags it based off some heuristics and saves it to Notion. The most frustrating part has been to use my trackpad to click done. Well, apparently you can press fn + return or 🌐 + return to do it! And no, ⌘ + return or just return doesn’t work here.

    Side note: Accepting text replacement on MacOS doesn’t happen with tab or return; it happens with space.

    A screenshot of a popup saying Auto-Tag Tools in Notion with a link pasted — and Cancel/Done options. Use fn + return or 🌐 + return to “click” Done here.
    A screenshot of a popup saying Auto-Tag Tools in Notion with a link pasted — and Cancel/Done options. Use fn + return or 🌐 + return to “click” Done here.

  • Scale Font Based on Screen Size With Tailwind

    Today I learnt that Tailwind doesn’t automatically scale base font sizes based off screen or viewport sizes. Sure there are plugin options and complicated stuff, but I am not a front end wizard, and adding this to my global.css helped. You check out the difference in font size for this website on mobile and desktop.

    html {
        font-size: 14px;
        @media screen(sm) {
          font-size: 16px;
        }
      }

  • Remove caps lock Press Delay

    If you are like me and use CapsLock as your hyperkey and sometimes wonder why it didn’t get triggered, apparently there is a built in delay. You can turn it off by using the following command in your terminal.

    hidutil property --set '{"CapsLockDelayOverride":0}'

  • Accent Color in CSS?

    TIL: You can set an accent color in CSS and it magically updates across your HTML user-interface controls! Just one line: accent-color and your whole app gets a color refresh!

    Just like this →

    body {
      accent-color: #ffc0cb;
    }

    Below are test html iframes with different accent colors


  • I tried Kiko

    Kiko Card for creating pretty image rolls out of long text
iOS only
    Kiko Card for creating pretty image rolls out of long text
    iOS only

    For some time, I had Kiko card on my list of apps that I would recommend to anyone . Then I decided to download it on the teeny tiny iOS device I have — iPhone SE3 for the sole purpose of airtag tracking and using Mela. And while it is nice, the lifetime plan is pretty expensive at $30 for what is basically a text → image app (pretty similar to Typeshare). And while the split text is pretty nice, it is “not intelligent”, aka it splits more poorly than LaTeX does, which isn’t a compliment. I do love the options bar though, and it renders really pretty images, so if the free plan templates are enough for you, give it a shot.


  • I launched Webtrotion on Product Hunt

    I launched my passion project, Webtrotion (you're reading this post on a site hosted using it), on Product Hunt. To my surprise, it reached the top 15 with 100 upvotes.

    It was Sunday, and for the first time since November when I started working on Webtrotion , I decided to run npm run format. This would ensure the code was properly formatted rather than the mess it had become after my extensive changes.

    When I saw the beautifully formatted code, I thought, "What if I launch it on Product Hunt?" To be clear, this wasn't my ideal first launch on Product Hunt, the first time I had put much more effort in, but ended up not launching in the end (the failed launch tweet that I had to specifically ask for removal).

    Look at those screenshots (on larger screens only)!

    For Webtrotion , the entire process, from the idea of launching to actually doing it, took about four hours with effort ranging from 5 to 15 minutes. Incredibly, I woke up this afternoon to find myself in the top 15 for the day with 100 upvotes, and I'm still in disbelief about how it happened. Some comments and reposts on my Twitter post definitely helped.

    It's astonishing how something I worked on for myself and decided to launch in a matter of 15 minutes, with hastily scraped together screenshots annotated using Shottr , ended up being such an amazing moment compared to a launch I had prepared and planned for. I guess one of the main differentiating factors is the freedom I felt. This was an open-source GitHub repo with no money to be made, no Lemonsqueezy link, and no tiers—just a passion project. It solidifies the one thing I know about myself: passion projects and figuring stuff out drive me more than money. Wanting something often cripples me, but because Webtrotion is a free-for-all niche project, I had nothing to lose and everything to gain. And I gained 😊.

    Support me on product hunt!
    Webtrotion - Notion-based configurable static website generator | Product Hunt


  • TIL about template tags in HTML

    One reason I believe I was having trouble getting pages indexed was due to the DOM size. This assumption is based on two observations: (a) when I had the same site in Quatro, it was much easier to get indexed; and (b) Notion returns a very shell-based HTML to Google's crawler (no images, colors, or icons). Most of my pages are stuck in "Discovered - currently not indexed." While I can't guarantee this will help, one major factor contributing to the large DOM size was the popovers I was creating.

    So, I asked Claude and GPT-4, and they told me about the <template> tag. I never knew about it before, but it reduced the DOM size from around 2000 to about 1200 (see here ). Not sure if it would make a difference, but a smaller DOM size always helps!

    Popovers, both pages and blocks, now use template tags to avoid rendering in the DOM, significantly reducing its size.
    Popovers, both pages and blocks, now use template tags to avoid rendering in the DOM, significantly reducing its size.